Integration Overview
Setting up QuickBooks Desktop
Setting up a New Company File
If you're starting from the beginning with QuickBooks or starting out a new company file to start integrating with CoConstruct, here are the basic steps you'll want to take:
- Once you've installed QuickBooks on your desktop, launch QuickBooks and choose the option for Create a new company > Start Setup.
- Enter your Business Name
- Select Industry > Construction General Contractor (unless otherwise applicable)
- Select the appropriate business type
- Enter your sales tax number, address and phone number
- Create Company
- Before starting to work in QuickBooks, you'll want to make sure some basic settings are adjusted. Go to Edit > Preferences and check the following settings:
- Jobs & Estimates > Company Preferences > "Do you create estimates?": Yes
- Jobs & Estimates > Company Preferences > "Do you do progress invoicing?": Yes
- Payments > Company Preferences > un-check "Use Undeposited Funds as a default deposit to account"
- If you are in a state or area where you must collect sales tax from customers: Sales Tax > Yes > Add sales tax item for each tax you must assess
- Time & Expenses > Company Preferences > "Do you track time?": Yes
Feel free to go through the other settings and make adjustments as you may want. The items above are the most typical settings for builders and remodelers and are the basic items needed to take advantage of the integration with CoConstruct.
Setting up Accounts
First, you'll want to set up the following accounts (select "Account" > New):
- Any bank accounts associated with your company that you'll want to use to accept monies or pay for bills and expenses (these will be a "Bank" type)
- Any credit cards associated with your company that you'll want to use to pay for bills and expenses (these will be a "Credit Card" type)
- An Accounts Receivable account where any money owed to you by clients will sit on reports until paid (this will be under "Other Account Types" > Accounts Receivable)
- An Accounts Payable account where any money you owe to vendors will sit on reports until paid (this will be under "Other Account Types" > Accounts Payable)
- Any additional loans or credit accounts that you wish to track as part of your business finances. You may want to check with your bookkeeper or accountant on the correct way to set up specific other accounts you might have.
If you followed the steps above for setting up your company file, you should already be set up with the basic accounts needed for tracking expenses and income. To verify that you have what you need, you'll first want to determine how you should be tracking money in and out based on your business.
There are two main ways to track these:
- Cost of Goods Sold and Expenses vs. Income: Tracking costs in this way will generate a Profit and Loss report for your job costs and overhead company expenses. Any money you pay out will be realized as expenses and any money you receive from your clients will be realized as income for your company in real time. This is the most common method of accounting.
- Assets vs. Liabilities: Tracking costs in this way will generate a Balance Sheet for your jobs costs. Any money you pay out will be held on your books as an asset (typically classified as "Work in Progress") and any money you receive from your clients will be held as a liability. This method of accounting is more common for:
- Spec Home/Production builders who are financing projects internally. This allows you to offset the liability of the loan you're incurring for the home by tracking purchases as assets. Once the home is sold, an adjustment would need to be made to the books to move costs over to expenses and offset the income received from the sale.
- Other instances where you might need more control over what you recognize as income and expenses for a period of time.
If you have questions about which of the above methods you should be utilizing for your business, you'll want to discuss this with your CPA. You can use our CPA Talking Sheet as a basis for this conversation.
Setting up Vendors
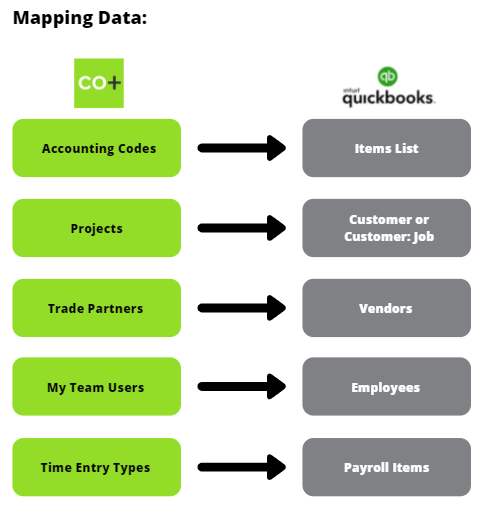
To accurately track who you're paying for for job costs, you'll need to set up your vendors in QuickBooks. Your vendors in QuickBooks will integrate with your Trade Partners in CoConstruct to facilitate the creation of bills from purchase orders.
To set up vendors:
- Select "Vendors" from the left hand menu or home screen
- Select "New Vendor..." at the top menu
- To set up a single entry, select "New Vendor"; select "Add multiple vendors" to copy and paste a list of vendors from Excel
- Save when complete.
Setting up Employees
In order to enable your account to push Time Clock entries from CoConstruct to QuickBooks, you'll want to set up your employees in QuickBooks. These will link to your builder users in CoConstruct for transferring the time information.
To set up employees:
- Select "Employees" from the left hand menu or home screen
- Select "New Employee..." at the top menu
- At a minimum, enter their first and last name. Any additional information you wish to enter for your company can be set up now also.
- Select "OK" to save.
Setting up Customers
To accurately track your expenses and income for each project, you'll need to set up your customers in QuickBooks. Your customers in QuickBooks will integrate with your projects in CoConstruct to facilitate most of the syncing of information.
To set up customers:
- Select "Customers" from the left hand menu or home screen
- Select "New Customer & Job" > "New Customer"
- If you do a lot of repeat business for customers, you can also create a "New Job" under existing customers to track financials for projects separately.
- Save when complete.
Setting up Items
Your items in QuickBooks will integrate with your accounting codes in CoConstruct to allow for accurate transfer of information for estimates, bills, time, invoices and payments. For more information on why we use the "Items List", see Why can't I link CoConstruct to my Chart of Accounts?
Each item in QuickBooks will link to your Chart of Accounts to track both income and expense transactions. As noted under the "Setting up Accounts" section above, there are a couple of options for how to set this up.
If you don't currently have a set of codes that you're using to track your project costs, feel free to reference the NAHB Accounting Codes attached at the bottom of this article. The provided spreadsheets are set up for import to QuickBooks Desktop and have some suggested accounts provided. It's highly recommended that you speak with your bookkeeper or accountant to ensure that these accounts will work for the way you're tracking costs for your business.
To set up items individually:
- Select "Lists" in the top menu bar > "Item List".
- At the bottom, select Item > New.
- Select the item "Type" - we typically recommend items be set up as a "Service" type.
- Enter the Item Name/Number - this will be your accounting code (e.g. "1010 Building Permits).
- Make sure the box for "This service is used in assemblies or is performed by a subcontractor or partner" is checked.
- Assign both an "Expense Account" and an "Income Account" for the item.
- Fill in any other relevant information specific for your business including Tax Codes and Preferred Vendors.
- Select "OK" to save.
To import a list/spreadsheet:
- Select "Lists" in the top menu bar > "Item List".
- At the bottom, select Item > New.
- Select "Add/edit multiple items".
- At the top left, select List > Service Items.
- At the top right, select "Customize Columns".
- Move at least the following columns to the Chosen Columns: Item Name, Income Account, Expense Account. If you have existing items you wish to get rid of, also select "Inactive".
- In the Inactive column, check off any items you wish to remove from your list.
- Scroll to the first blank row and copy and paste the item names from your spreadsheet into the "Item Name" column. Be sure to assign both an income and expense account to each item that will be used on invoices/estimates and bills/expenses respectively to be sure they track to the correct accounts on your financial statements.
You can also reference our Help Center article Importing Accounting Codes to QuickBooks for instructions on setting up multiple items from a spreadsheet.
Setting up Payroll Items
Payroll items are used in CoConstruct to differentiate the rates at which your labor costs are represented. These will link to your "Time Entry Types" within the CoConstruct time clock.
In QuickBooks, these also allow you to pay your employees at different rates for things such as hourly vs. overtime hours or office vs. field work.
To set up payroll items:
- Select the "Employees" tab in the top menu bar > Enter Time > Use Weekly Timesheets.
- Select an Employee name at the top.
- Click into the "Payroll Item" column > select the arrow drop down > Add new.
- Select the appropriate options for the wage type and your correct payroll expenses account.
- Repeat for any additional payroll items you wish to set up.
Set up Accounting Integration
Overview
CoConstruct integrates with your desktop installation of QuickBooks by using a QuickBooks tool called the Web Connector.
This Web Connector needs to be configured to sync your QuickBooks information to CoConstruct, and once everything's set up, we'll automatically sync your data on a regular basis.
Supported versions: Before getting started, check our list of supported software to make sure that your version of QuickBooks is fully supported for the CoConstruct integration.
Configuring QuickBooks Web Connector
Start by heading to Settings > Accounting (note only admins will see this option). Click on "QuickBooks" and select the "Desktop" version.
- Make sure you’re on the computer where you have QuickBooks Desktop installed. Open QuickBooks and log in as an admin.
- If you are using multiple company files in QuickBooks, you can only sync one with a single CoConstruct account
- Make sure the company file that you would like to sync is open
- Download the QWC configuration file provided on the integration page.
- Open that file. QuickBooks Web Connector should open automatically. (If QuickBooks Web Connector doesn’t open, you may need to download and install it.) Note: Canadian Quickbooks does not include the web connector so it will need to be downloaded first,)
- A window titled "Authorize New Web Service" will appear requesting your approval. Click "OK".
- A window titled "QuickBooks - Application Certificate" will appear asking if you want to grant access. Select "Yes, whenever this QuickBooks company file is open." Click "Continue..."
- You do not need to grant access to personal data such as Social Security Numbers
- On the next window titled "Access Confirmation," click "Done."
- When you confirm, the connection will be established and Web Connector will open.
- QuickBooks Web Connector will now list "CoConstruct Accounting Service" as an application.
- Enter the password that you use to log into CoConstruct in the "Password" field
- If you ever change your CoConstruct email address or password, you will need to update your Web Connector setup. We have more information on these different scenarios here.
- Check the box in the "Auto-Run" column to allow syncing to happen automatically, and choose a frequency (every 60 minutes is a good starting point). When setting these auto-run periods, be aware of how long your Web Connector sync takes. If the Web Connector attempts to start a sync while one is already running, it will lock up the syncing process, so be sure to give some lag time in between.
- Check the box to the left of the "CoConstruct Accounting Service." Click the button at the top labeled "Update Selected."
- Web Connector will start syncing. Wait for the progress to reach 100% and the "Last Result" to be a green "Connection Closed" message. This will indicate that the sync was successful. If you see an error at this step, repeat step 10 above and reach out to support with the specific error message you are seeing. Click "Hide" to ensure that Web Connector stays running in the background so the auto-runs will perform.
To open up Web Connector at any point in time after the initial setup:
In QuickBooks go to File > Update Web Services. If you don't see that option, you can try searching for "Web Connector" from your computer's start menu.
To run a manual sync with Web Connector at any point in time outside of the scheduled auto-run times:
In Web Connector, check the box on the left beside "CoConstruct Accounting Service" and then click "Update Selected" at the top of the Web Connector window
Linking QuickBooks to your CoConstruct account
Back in CoConstruct, you've already done the heavy lifting, so you'll just need to confirm that you've configured Web Connector.
- At the bottom right of your screen, select the green "Continue" button.
- Your account is now connected to QuickBooks, and the remaining setup in this article will help to make sure your projects and accounting codes are linked up between the two systems.
- Make sure you save before you exit the Accounting Integration settings page.
A run-down of the Accounting Integration settings
How do you want to link projects to QuickBooks?: This dropdown determines how your CoConstruct "projects" relate to your "customers" or "jobs" within QuickBooks. Choose whether you are tying your project costs to a given "customer" record, or if you have "jobs" set up underneath each of your customers in order to track this information.
Invoices
These settings relate to the invoice-syncing capability of the CoConstruct integration
Project Defaults - Change Orders > Invoices: Sets whether or not new change orders you create will automatically sync to create a new invoice in QuickBooks once they are fully-approved. This setting can be overwritten when you are creating individual change orders or variations.
Select an item code to be used on customer invoices: We need to specify a single item code to use on invoices generated by CoConstruct, so if you have one, we recommend choosing one specific to change orders.
What Accounts Receivable account do you use for customer invoices?: The A/R account that should be used for invoices that are created by CoConstruct.
Client Payments
This setting relates to syncing your clients' payments to the financial summary view
Project Defaults - Client Payments: Sets whether new projects will be set up for syncing your clients' payments. This setting can be changed on individual projects from the project Setup page.
Budget Actuals
These settings relate to the budget actuals integration
Project Defaults - Budget Actuals: Sets whether new projects will be set up for syncing your actuals. This setting can be overwritten when you are creating a new project.
Show budget actuals details to clients: If you share project budgets with your client, this sets whether you want your clients to be able to see the itemized breakout of your actuals (individual bills, payments or labor along with their dates), rather than just seeing the overall amounts. This setting can be changed for individual clients from the project Setup page.
Select invoice items to include on budget (open-book projects only): This setting is covered in more detail here.
Purchase Orders
These settings relate to purchase order integration
Project Defaults - Purchase Orders > Bills: Sets whether purchase orders automatically push a bill to QuickBooks once marked "Work Verified". This setting can be changed for individual projects on the project Setup page.
What Accounts Payable account do you use for vendor bills: The A/P account that should be used for bills that are created by CoConstruct for work-verified purchase orders.
Linking or importing your QuickBooks Items into CoConstruct
As a next step, you will want to ensure that CoConstruct and QuickBooks are speaking the same language by loading and linking your QuickBooks Items into CoConstruct as what our system calls "accounting codes".
Do this by going to the "Accounting Codes" tab at the top of your accounting integration settings.
If you already have a list of accounting codes configured in CoConstruct, you will want to go through to link each code up with the corresponding Item from QuickBooks.
Otherwise, you can import your Item List directly into CoConstruct.
Note: If you are syncing budget actuals with CoConstruct, your full Item List will be imported when you do your first sync. As a result, the best practice will be to link or import things now and deactivate any extra Items that you don't need in your CoConstruct accounting code list.
Click here for more information on linking and importing accounting codes.
Linking each project to the right customer or job
Now your account is fully linked, but you also need to link up individual projects to your accounting system. Note that this can only by done by admin users in CoConstruct.
- From the Settings > Accounting, navigate to the "Projects" page. From an individual project's Setup page, you'll see the option to link the project to QuickBooks under a section heading of "QuickBooks Integration"
- Linking new projects when creating them. Simply select to "Show optional settings" to view options for linking directly to QuickBooks.
- Use the Accounting Settings "Project" page to link any existing project OR individually link any project right from the Project Setup page.
- In the "QuickBooks Integration" section, click "Link Project"
- Enter the QuickBooks Customer Name and, if applicable, the Job Name
- If the project has already been created in QuickBooks, you can select it from a dropdown
- Otherwise, if you haven't yet created the customer or job in QuickBooks, you can have CoConstruct create it for you using the "+" icon and simply typing in the names that you want to use on the QuickBooks side of things. Remember that Web Connector will need to run before you will see the customer and/or job created in your QuickBooks file
- When you click to add or update the project, the linkage will be created
- If you already have expenses or payments logged in QuickBooks that you want to pull in for your newly linked jobs: After you link up your projects, run a new sync via Web Connector with the following steps.
- In QuickBooks, go to File > Update Web Services
- Check the box next to "CoConstruct Accounting Service" and click the button at the top to "Update Selected"
- While the earlier Web Connector syncing pulled in basic QuickBooks information, this new sync will pull in all of the relevant transactions, if any, for the newly-linked projects
- You can then "Sync Data Now" on the Financial pages of your linked CoConstruct projects to pull in those transactions to the project
Next steps
Congratulations! You've walked through the setup and linked the important parts of your CoConstruct projects to the right records within QuickBooks.
Next, explore all the available integration features now that everything is linked up -- More information can be found here
Troubleshooting issues with Web Connector
Need to troubleshoot problems with Web Connector at any point?
We've got a guide that you can use as a jumping off point.
If you still need help, let us know!